In this tutorial, you’ll be building an attendance app using Cordova and a Bluetooth Low Energy (BLE) Peripheral. You’ll create your own BLE peripheral using Node.js and communicate with it using a Cordova app.
I assume that you already know Cordova and the Ionic framework. If not, check out this tutorial on Building a Simple App Using Ionic, an Advanced App Framework.
You can find the final project on Github.
Bluetooth Low Energy Concepts
First I’d like to get some concepts out of the way. There are two possible devices that you can connect using BLE:
- Central: Also called the ‘master’. This is the device that initiates the connection to a slave or peripheral device. This is usually a smartphone, a tablet or a computer. In this tutorial, the central device is a smartphone running the app which you’ll be creating.
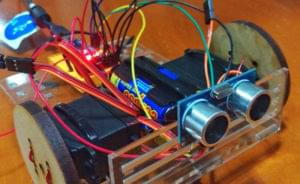
- Peripheral: Also called the ‘slave’. It’s responsible for advertising and waiting for central devices to connect to it. Examples of these devices include fitness trackers (e.g. fitbit) or beacons. In this tutorial, the peripheral I’m going to use is a Raspberry Pi 3. If you don’t have one, it can also be your smartphone or your computer. It should work as long as the bluetooth device that you use supports bluetooth 4.0.
Data exchange is implemented with Generic Attribute Profile (GATT). GATT defines the way in which two devices transfer data. It comprises of Services and Characteristics. Services are collections of characteristics that encapsulate the behavior of a device. For example there’s the Blood Pressure Service which exposes blood pressure data from a blood pressure monitor. Characteristics are the different types of data available in a service. For the blood pressure service, there’s a characteristic for the blood pressure measurement, intermediate cuff pressure, and blood pressure feature. You’ll be creating your own services and their characteristics later.
Building the App
There are two components to this attendance app, the BLE peripheral and the app that’s going to talk to it. The BLE peripheral advertises a service which allows connected devices to write data to it. And the app writes data to this service via its characteristic. Specifically you’ll ask for the first name and last name of the attendee. The user will tap on the scan button which will list all the BLE peripherals near the users device. Then the user connects to one of these peripherals. Once connected, the app will ask the user to input their first and last name. Finally the user taps on the attend button to submit their name to the BLE peripheral.
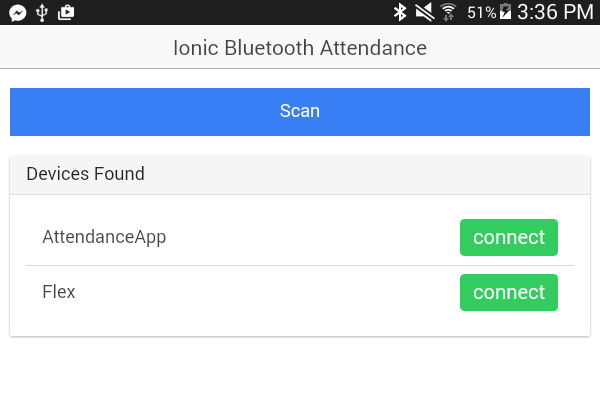
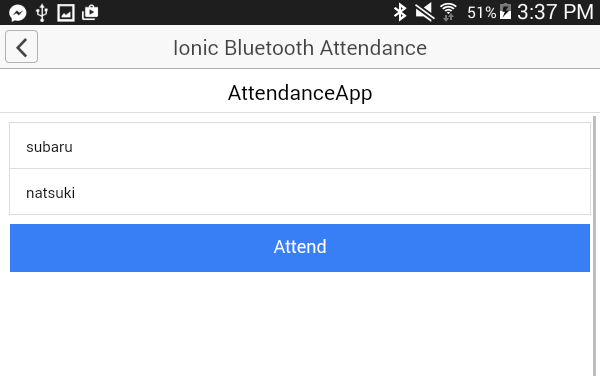
Here are a couple of screenshots that shows the final output:
Now it’s time for you to build the app. Start by creating a new Ionic app:
ionic start ionicBLEAttendance blank
Add the Bluetooth Low Energy Central Plugin for Cordova. This is the plugin that you’ll use to talk to the BLE peripheral which you’ll build later.
cordova plugin add cordova-plugin-ble-central
Navigate inside the www directory, this will be the base directory you’ll be working in. Open index.html and replace the existing content with the following:
<!DOCTYPE html>
<html>
  <head>
    <meta charset="utf-8">
    <meta name="viewport" content="initial-scale=1, maximum-scale=1, user-scalable=no, width=device-width">
    <title></title>

    <link href="lib/ionic/css/ionic.css" rel="stylesheet">
    <link href="css/style.css" rel="stylesheet">

    <script src="lib/ionic/js/ionic.bundle.js"></script>

    <script src="cordova.js"></script>

    <script src="js/app.js"></script>
    <script src="js/factories/DeviceFactory.js"></script>
    <script src="js/controllers/HomeController.js"></script>
    <script src="js/controllers/DeviceController.js"></script>
  </head>
  <body ng-app="starter">
    <ion-nav-view></ion-nav-view>
  </body>
</html>
In this code you’re linking three new files in addition to the default ones. Create these files.
Open app.js and add the following inside the callback function for the $ionicPlatform.ready event. This checks if bluetooth is enabled in the device. If it’s not enabled, it tries to enable it by prompting the user to enable it.
ble.isEnabled(
  function(){
    // Bluetooth is enabled
  },
  function(){
    // Bluetooth not yet enabled so we try to enable it
    ble.enable(
      function(){
        // bluetooth now enabled
      },
      function(err){
        alert('Cannot enable bluetooth');
      }
    );
  }
);
After the run function, add the route configuration:
.config(function($stateProvider, $urlRouterProvider) {
  $stateProvider

  .state('home', {
    url: '/home',
    templateUrl: 'templates/home.html'
  })

  .state('device', {
    url: '/device/:id',
    templateUrl: 'templates/device.html'
  });

  $urlRouterProvider.otherwise('/home');
});
Device Factory
The device factory serves as the data store for the devices returned by the peripheral scan. It has methods for adding a device, getting all devices, getting a specific device, and resetting the data store. Open js/factories/DeviceFactory.js and add the following code.
(function(){
  angular.module('starter')
  .factory('DeviceFactory', [DeviceFactory]);

  function DeviceFactory(){
    var devices = [];
    return {
      addDevice: function(device){
        devices.push(device);
      },

      getDevices: function(){
        return devices;
      },

      getDevice: function(id){
        var device_found = devices.filter(function(device){
          return device.id == id;
        });
        return device_found[0];
      },

      reset: function(){
        devices = [];
      }

    };
  }

})();
Home Page
The home page is the default page that the user sees when opening the app. This page allows the user to scan for nearby BLE peripherals and connect to them.
Create templates/home.html and add the following:
<ion-view title="Ionic BLE Attendance" ng-controller="HomeController as home_ctrl">
  <header class="bar bar-header bar-stable">
    <h1 class="title">Ionic Bluetooth Attendance</h1>
  </header>

  <ion-content class="has-header padding">
    <button class="button button-positive button-full" ng-click="scan()">
      Scan
    </button>

    <div class="card" ng-if="devices.length">
      <div class="item item-divider">
        Devices Found
      </div>
      <div class="item">
        <ul class="list">
          <li class="item item-button-right" ng-repeat="device in devices">
            {{device.name}}
            <button class="button button-balanced" ng-click="connect(device.id)">
            connect
            </button>
          </li>
        </ul>
      </div>
    </div>


  </ion-content>

</ion-view>
The code behind the home page is the home controller. Open js/controllers/HomeController.js and add the following code:
(function(){
  angular.module('starter')
  .controller('HomeController', ['$scope', '$state', 'DeviceFactory', HomeController]);

  function HomeController($scope, $state, DeviceFactory){

    $scope.devices = []; // the devices listed in the page

    $scope.scan = function(){

      DeviceFactory.reset();
      ble.startScan(
        [],
        function(device){
          if(device.name){
            DeviceFactory.addDevice({ 'id': device.id, 'name': device.name });
          }
        },
        function(err){
          alert('Scanning failed. Please try again.');
        }
      );

      setTimeout(
          ble.stopScan,
          1500,
          function(){
            $scope.$apply(function(){
              $scope.devices = DeviceFactory.getDevices();
            });
          },
          function(){
            // Stopping scan failed
          }
      );

    }

    $scope.connect = function(device_id){
      ble.connect(
        device_id,
        function(res){
          $state.go('device', { 'id': device_id });
        },
        function(err){
          alert('Something went wrong while trying to connect. Please try again');
        }
      );
    }

  }

})();
In the code above, the scan method first empties the array of peripherals stored in the device factory. Then it scans for nearby peripherals. The startScan method accepts an array of services to discover as its first argument. In this case, you pass an empty array that will discover any services advertised by nearby peripherals. The second argument is the callback function executed every time it discovers a new device, adding the discovered device to the device factory using its addDevice method. The addDevice method accepts an object containing the ID of the device and the name given to it. The device ID can be a UUID or a MAC Address.
$scope.scan = function(){
    DeviceFactory.reset();
    ble.startScan(
      [],
      function(device){
        if(device.name){
          DeviceFactory.addDevice({ 'id': device.id, 'name': device.name });
        }
      },
      function(err){
        alert('Scanning failed. Please try again.');
      }
    );
}
The ble.startScan method executes infinitely, that’s why you have to call the ble.stopScan method to stop the scanning. You do this after 1.5 seconds (1500 milliseconds), then $scope is updated with all the devices stored in the device factory which in turn updates the UI to list all the devices discovered.
setTimeout(
    ble.stopScan,
    1500,
    function(){
      $scope.$apply(function(){
        $scope.devices = DeviceFactory.getDevices();
      });
    },
    function(){
      // Stopping scan failed
    }
);
Here’s a sample response that you get from a ble.startScan call:
[
   {
      "advertising":{

      },
      "id":"B8:XX:XX:XX:XX:XX",
      "rssi":-57,
      "name":"AttendanceApp"
   },
   {
      "advertising":{

      },
      "id":"E7:YY:YY:YY:YY:YY",
      "rssi":-67,
      "name":"Flex"
   }
]
The advertising property is an ArrayBuffer, that’s why its empty. You can convert this to a string if you want to access the advertising data. The rssi is the Received Signal Strength Indication which is an indication of the strength of the signal.
Next is the connect method called when a user taps the connect button of a discovered peripheral. The device ID passed to this method connects to the peripheral. Once the app connects to the peripheral, it navigates to the device page, passing in the device ID as a state parameter.
$scope.connect = function(device_id){
  ble.connect(
    device_id,
    function(res){
      $state.go('device', { 'id': device_id });
    },
    function(err){
      alert('Something went wrong while trying to connect. Please try again');
    }
  );
}
Here’s a sample response when you call ble.connect:
{
   "characteristics":[
      {
         "characteristic":"2a00",
         "service":"1800",
         "properties":[
            "Read"
         ]
      },
      {
         "characteristic":"2a01",
         "service":"1800",
         "properties":[
            "Read"
         ]
      },
      {
         "descriptors":[
            {
               "uuid":"2902"
            }
         ],
         "characteristic":"2a05",
         "service":"1801",
         "properties":[
            "Indicate"
         ]
      },
      {
         "descriptors":[
            {
               "uuid":"2902"
            }
         ],
         "characteristic":"34cd",
         "service":"12ab",
         "properties":[
            "Write"
         ]
      }
   ],
   "advertising":{

   },
   "id":"B8:XX:XX:XX:XX:XX",
   "services":[
      "1800",
      "1801",
      "12ab"
   ],
   "rssi":-55,
   "name":"AttendanceApp"
}
It has an array of characteristics, but the one you’re interested in is the fourth item which is the characteristic you’ll be creating later:
{
   "descriptors":[
      {
         "uuid":"2902"
      }
   ],
   "characteristic":"34cd",
   "service":"12ab",
   "properties":[
      "Write"
   ]
}
Device Page
The device page is the page the user navigates to when they connect to a peripheral. This page allows the user to enter their first and last name and tap on the attend button to record their attendance.
Create templates/device.html and add the following:
<ion-view title="Ionic BLE Attendance" ng-controller="DeviceController as device_ctrl" ng-init="init()">
  <header class="bar bar-header bar-stable">
    <button class="button icon ion-chevron-left" ng-click="backToHome()"></button>
    <h1 class="title">Ionic Bluetooth Attendance</h1>
  </header>
  <header class="bar bar-subheader">
    <h2 class="title">{{device.name}}</h2>
  </header>

  <ion-content class="has-header has-subheader padding">

    <div class="list">
      <label class="item item-input">
        <input type="text" ng-model="device_ctrl.attendee.firstname" placeholder="First Name">
      </label>
      <label class="item item-input">
        <input type="text" ng-model="device_ctrl.attendee.lastname" placeholder="Last Name">
      </label>
      <button class="item button button-positive button-full" ng-click="attend()">
      Attend
      </button>
    </div>

  </ion-content>

</ion-view>
The code behind the device page is the device controller. Open js/controllers/DeviceController.js and add the following code:
(function(){
  angular.module('starter')
  .controller('DeviceController', ['$scope', '$state', '$stateParams', 'DeviceFactory', DeviceController]);

  function DeviceController($scope, $state, $stateParams, DeviceFactory){

    var me = this;

    var service_id = '12ab';
    var characteristic_id = '34cd';

    me.attendee = {
      firstname: '',
      lastname: ''
    }

    $scope.init = function(){
      $scope.device = DeviceFactory.getDevice($stateParams.id);
    }

    $scope.attend = function(){
      ble.write(
        $stateParams.id,
        service_id,
        characteristic_id,
        btoa(JSON.stringify(me.attendee)),
        function(response){
          if(response == 'OK'){
            alert("Your attendance is recorded!");
            ble.disconnect($stateParams.id);
            $state.go('home');
          }
        },
        function(err){
          alert("Error occured while trying to record your attendance. Please try again.");
        }
      );
    }

    $scope.backToHome = function(){
      $state.go('home');
      ble.disconnect($stateParams.id);
    }

  }

})();
Inside the controller is the service and characteristic ID. These values are available as a property within the device object returned when you connect to a peripheral. But you’re working with the assumption that the app already knows these values beforehand since the maker of the app and the BLE peripheral is the same person. That’s why they’re hard-coded here instead of extracted from the return value of the ble.connect method.
var service_id = '12ab';
var characteristic_id = '34cd';
When the device page initializes, it calls the init function. This initialises the value of the device object by calling the getDevice method in the device factory. This method returns a specific device given a device ID.
$scope.init = function(){
  $scope.device = DeviceFactory.getDevice($stateParams.id);
}
When the user taps the attend button, this method executes. It calls ble.write method which is responsible for writing data to a characteristic. This accepts the following arguments:
- device ID: The UUID or the MAC Address of the device.
- service UUID: The unique ID assigned to the service.
- characteristic UUID: The unique ID assigned to the characteristic.
- data: The data you want to send. In this case an object containing the first and last name of the attendee. It’s converted to a string using
JSON.stringifyand the resulting string converted to a base64 encoded string usingbtoa. This is because you can’t send plain strings via BLE.
The fourth and fifth arguments are the success callback and error callback functions. If the write request is successful, disconnect from the device using the ble.disconnect method. The $stateParams.id passed to this method is the device ID that you passed earlier as a state parameter from the home controller. The disconnect method is called because a peripheral can only connect to one central device at a time. This means that when a specific central device connects, it stops advertising. And when it stops advertising, it doesn’t show during a scan.
$scope.attend = function(){
  ble.write(
    $stateParams.id,
    service_id,
    characteristic_id,
    btoa(JSON.stringify(me.attendee)),
    function(response){
      if(response == 'OK'){
        alert("Your attendance is recorded!");
        ble.disconnect($stateParams.id);
        $state.go('home'); // go back to home page
      }
    },
    function(err){
      alert("Error occurred while trying to record your attendance. Please try again.");
    }
  );
}
An option to manually go back to the home page is also provided. Here the ble.disconnect method is called.
$scope.backToHome = function(){
  $state.go('home');
  ble.disconnect($stateParams.id);
}
BLE Peripheral
Now it’s time to add the code for the BLE peripheral. Before you proceed, Intsall Bleno as you’ll be using this Node.js module to implement a BLE peripheral.
Now that you’re back, create a new folder for the emulated peripheral, create a package.json file and add the following:
{
  "name": "ble-server",
  "version": "1.0.0",
  "description": "",
  "main": "attendance.js",
  "scripts": {
    "test": "echo \"Error: no test specified\" && exit 1"
  },
  "author": "",
  "license": "ISC",
  "dependencies": {
    "bleno": "^0.4.0"
  }
}
Open a new terminal window and install the dependencies by executing npm install. This installs bleno.
Next, create an attendance.js file and add the following code:
var bleno = require('bleno');

var attendees = [];
var settings = {
  service_id: '12ab',
  characteristic_id: '34cd'
};

bleno.on('stateChange', function(state){
  if(state === 'poweredOn'){
    bleno.startAdvertising('AttendanceApp', ['12ab']);
  }else{
    bleno.stopAdvertising();
  }
});

bleno.on('advertisingStart', function(error){
    if(error){
      // error on advertise start
    }else{
      console.log('started..');
      bleno.setServices([
        new bleno.PrimaryService({
          uuid : settings.service_id,
          characteristics : [
            new bleno.Characteristic({
              value : null,
              uuid : settings.characteristic_id,
              properties : ['read', 'write'],
              onWriteRequest : function(data, offset, withoutResponse, callback){
                var attendee = JSON.parse(data.toString());
                attendee.time_entered = Date.now();
                attendees.push(attendee);
                console.log(attendees);
                callback(this.RESULT_SUCCESS);
              }
            })
          ]
        })
      ]);
    }
});
Breaking down the code above, first include the bleno module:
var bleno = require('bleno');
Next, is the attendees array which serves as the storage for the list of attendees. And below it is an object containing the service ID and characteristic ID used as the UUID for the service and characteristic later on. These are the same in the device controller earlier.
var attendees = []; // storage for the attendees
var settings = {
  service_id: '12ab',
  characteristic_id: '34cd'
};
Listen for when the device state changes. You want to start advertising once the device is already powered on and stop if anything else. Check out the list of events if you want to perform any other operation based on the device state. The startAdvertising method accepts two arguments – the name that you want to give to the device and an array of service UUID’s to advertise.
bleno.on('stateChange', function(state){
  if(state === 'poweredOn'){
    bleno.startAdvertising('AttendanceApp', [settings.service_id]);
  }else{
    bleno.stopAdvertising();
  }
});
Listen for when the advertising starts:
bleno.on('advertisingStart', function(error){
    if(error){
      // error on advertise start
    }else{
        ...
    }
});
If there are no errors, set the primary services made available on the peripheral:
bleno.setServices([
    ...
]);
Inside the array, create a new primary service. This accepts the UUID that you want to assign to the service, as well as an array of characteristics:
new bleno.PrimaryService({
    uuid : settings.service_id,
    characteristics : [
        ...
    ]

});
Inside the array for storing characteristics, create a new characteristic. This accepts an object containing a default value for the characteristic, the UUID that you want to assign, an array of properties, and the implementation method for each property.
new bleno.Characteristic({
  value : null,
  uuid : settings.characteristic_id,
  properties : ['write'],
  onWriteRequest : function(data, offset, withoutResponse, callback){
    var attendee = JSON.parse(data.toString());
    attendee.time_entered = Date.now();
    attendees.push(attendee);
    console.log(attendees);
    callback(this.RESULT_SUCCESS);
  }
})
Properties can be read, write, writeWithoutResponse, notify, or indicate. You can use any combination of each of these depending on your needs. For this attendance app, you only need write, so the corresponding implementation method is onWriteRequest. The following arguments are passed into this method every time the app makes a write request:
data: The data sent from the app received in the form of aBufferthat’s why you need to call thetoStringmethod to convert it back to JSON string.offset: If the data you’re trying to send is a sequence of bytes. And you only want to transmit a few bytes for each write request, use the offset to extract the value that you need. Think of it as the implementation of pagination in BLE. The offset isn’t used in this tutorial but its a good to know.withoutResponse: A boolean value representing whether the write method wants a response.callback: The callback function responsible for sending a response back to the app. Callingcallback(this.RESULT_SUCCESS)is equivalent toreturn "OK". This is the value passed as an argument to the success callback function of theble.writemethod in the app earlier.
Run the peripheral by executing node attendance.js on your terminal. You should see the following on your terminal once it has started advertising:
started..
Running the App
Run the app by first adding the platform:
cordova platform add android
Then run it on your device or emulator:
cordova run android
Next Steps
That’s it! In this tutorial you learned how to create a Cordova app that talks to a BLE peripheral. This is just the beginning. There are lots of possibilities in using BLE peripherals and bluetooth in general. So here are a couple of recommendations to take what you’ve learned even further:
- Use Sockets so that every time someone checks in to the room, all the other people who have checked in before will get notified. You can use Socket.io to implement this.
- Instead of having a device such as the Raspberry Pi act as a peripheral, you can have the app act as a peripheral and the Raspberry Pi as a central module. This allows the central module to indefinitely scan for nearby devices and determine who attended, which specific times were they in the room and when have they left. You can use noble and the bluetooth LE cordova plugin to implement this.
- Check out the other articles about Bluetooth on Sitepoint.
I hope this tutorial provided you with enough knowledge to get started building apps which uses Bluetooth Low Energy technology. If you have other project ideas, comments, or questions please let me know in the comments.
Frequently Asked Questions (FAQs) about Communicating with Bluetooth Low Energy Devices in Cordova
How Can I Connect to a Bluetooth Low Energy Device Using Cordova?
To connect to a Bluetooth Low Energy (BLE) device using Cordova, you first need to install the Cordova BLE plugin. This plugin provides a simple JavaScript API for iOS and Android to scan, connect, read, write and notify BLE characteristics. After installing the plugin, you can use the ble.scan() function to discover nearby BLE devices. Once you’ve found the device you want to connect to, you can use the ble.connect() function to establish a connection. Remember to handle the connection status and errors properly to ensure a smooth user experience.
What Are the Common Issues When Using Cordova BLE Plugin and How to Troubleshoot Them?
Some common issues when using the Cordova BLE plugin include connection failures, data reading/writing errors, and device discovery problems. To troubleshoot these issues, you can use the ble.startScanWithOptions() function with the reportDuplicates option set to true. This will allow you to see all advertising packets, which can help you diagnose connection issues. For data reading/writing errors, make sure you’re using the correct service and characteristic UUIDs. If you’re having trouble discovering devices, try using a BLE scanner app to verify that the devices are advertising correctly.
How Can I Read Data from a BLE Device Using Cordova?
To read data from a BLE device using Cordova, you need to use the ble.read() function. This function takes three parameters: the device id, the service UUID, and the characteristic UUID. The function will return a ArrayBuffer containing the data read from the characteristic. You can then convert this ArrayBuffer to a suitable format for your application.
How Can I Write Data to a BLE Device Using Cordova?
To write data to a BLE device using Cordova, you can use the ble.write() function. This function takes four parameters: the device id, the service UUID, the characteristic UUID, and the data to write. The data should be an ArrayBuffer or a string. If you’re writing a string, the plugin will convert it to an ArrayBuffer using UTF-8 encoding.
How Can I Get Notifications from a BLE Device Using Cordova?
To get notifications from a BLE device using Cordova, you can use the ble.startNotification() function. This function takes three parameters: the device id, the service UUID, and the characteristic UUID. When the characteristic value changes, the plugin will call a success callback with the new value.
How Can I Disconnect from a BLE Device Using Cordova?
To disconnect from a BLE device using Cordova, you can use the ble.disconnect() function. This function takes one parameter: the device id. After calling this function, the device will be disconnected and any ongoing operations will be cancelled.
How Can I Check the Connection Status of a BLE Device Using Cordova?
To check the connection status of a BLE device using Cordova, you can use the ble.isConnected() function. This function takes one parameter: the device id. It will return a boolean indicating whether the device is currently connected.
How Can I Handle Errors When Using the Cordova BLE Plugin?
When using the Cordova BLE plugin, errors can be handled using the error callback provided by each function. This callback will be called with an error object containing a errorMessage property that describes the error. You can use this information to diagnose the problem and provide appropriate feedback to the user.
How Can I Improve the Performance of BLE Communication Using Cordova?
To improve the performance of BLE communication using Cordova, you can use the ble.requestMtu() function to request a larger MTU size. This will allow you to send and receive larger packets, reducing the overhead of the BLE protocol and improving the data transfer speed.
How Can I Ensure the Compatibility of the Cordova BLE Plugin Across Different Platforms?
The Cordova BLE plugin is designed to be compatible with both iOS and Android. However, due to differences in the BLE implementations of these platforms, there may be some differences in behavior. To ensure compatibility, you should test your application on both platforms and handle any platform-specific issues appropriately.
 Wern Ancheta
Wern is a web developer from the Philippines. He loves building things for the web and sharing the things he has learned by writing in his blog. When he's not coding or learning something new, he enjoys watching anime and playing video games.