
In this tutorial I’ll use the Microsoft Face API to create a face recognition app with React Native. I’m going to assume that you’ve already built a React Native app so won’t cover all parts of the code. If you’re new to React Native, I recommend you read my previous tutorial on “Build an Android App with React Native“. You can find the full source code for the app for this tutorial on Github.
Acquiring an API Key
The first step is to acquire an API key from Microsoft Azure. If you’re not aware of Microsoft Azure, it’s Microsoft’s Cloud Computing Platform. Sign up for a Microsoft Live account if you don’t already have one. For those of you new to Azure, sign up for a free trial. This will give you 30 days to use Azure for free, provided you don’t exceed the allotted HTTP requests for the free tier of the Face API. If you’ve already created an account before, you can use your existing subscription plan. If you don’t have one, select the Pay-As-You-Go plan so you get charged for only what you use.
Once you have signed up for an account, login and click on the search icon at the top of the screen and search for ‘cognitive services’. From the dropdown that shows, click on Cognitive Services accounts (preview) and you should see the following screen:

Click on add and the following screen will show:
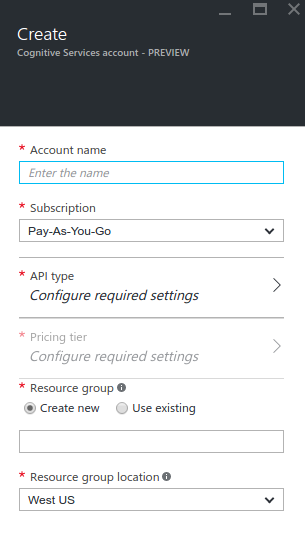
Fill out the required fields. You can enter any name that you want for the account name, and subscription should be ‘free trial’ if you’re a new user and ‘pay-as-you-go’ if you’re an existing one. Resource group can be any name you want. Resource group location should be a server near your current location but you can stick with the default if you want. For the API Type select ‘Face API’ then ‘free’ for the pricing tier. This will ensure you don’t spend anything. Once you’re done filling everything out, click on the create button and wait for the resource to finish deploying.
Once the resource is deployed, click on the All resources menu located on the left sidebar. The resource you’ve created should be listed in there, otherwise refresh the page. Click on the resource and you should see the following screen:
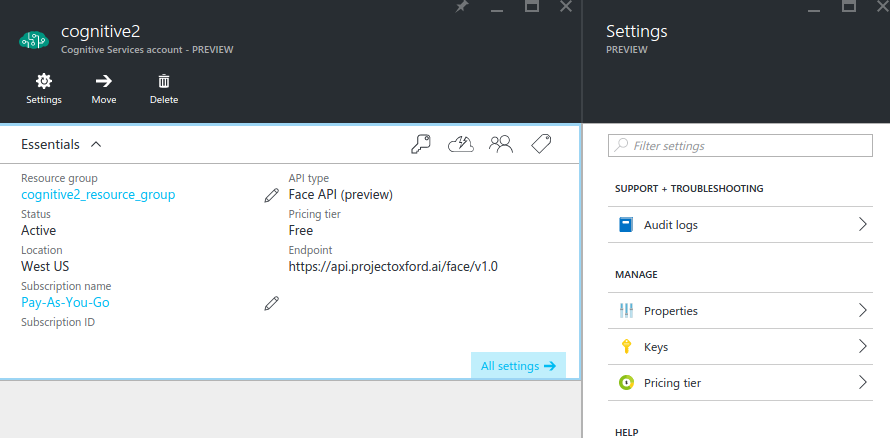
Click on keys to view the API keys. Take note of one of these keys as you will use them later when making a request to the API.
Building the App
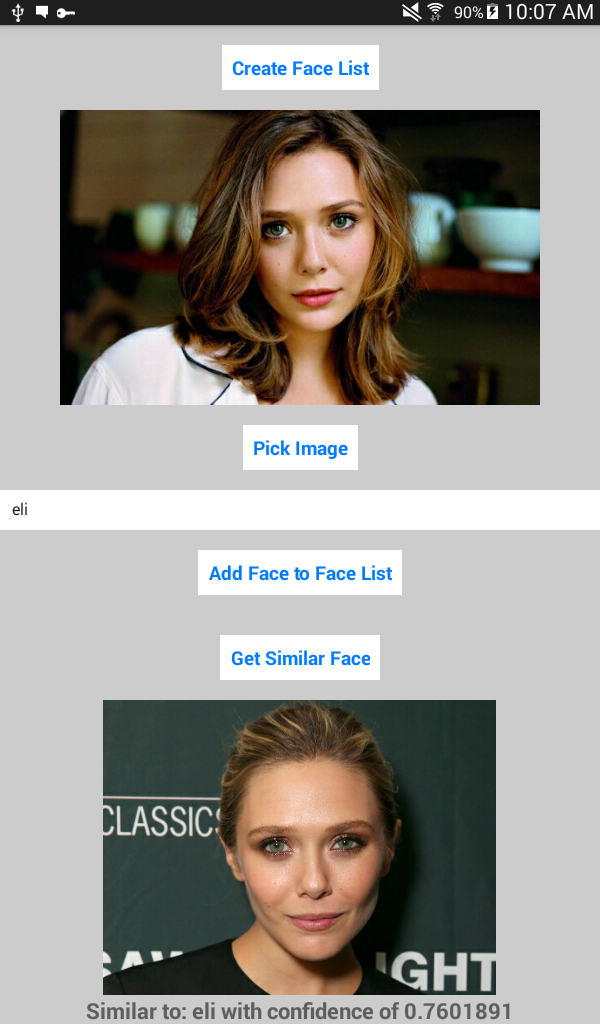
The app you’re going to build is going to do the following things:
- Create a face list: A face list is a container for faces. Think of it as a database for a group of related faces.
- Add faces to the face list: The face list is a container, you need to add photos which contain a single face. These will be used for comparison later.
- Get similar face: Used for getting a similar face from the face list based on a face detected on a photo.
The flow is to first create a face list, add photos of faces to it, and then get a list of similar faces based on a photo provided.
Here’s how the app will look once the user has uploaded a photo and pressed the button for getting a similar face:
Installing Dependencies
First create a new React Native project:
react-native init RNSimilar
Note: I’m using React Native version 0.25.1 in this tutorial. The React Native project moves fast, so if there’s already a higher version available at the time of writing of this article, there’s a chance the dependencies used may break for that version of React Native. If you’re reading this at a later date I recommend rninit, an alternative to the React Native CLI tool which allows you to install a specific version of React Native. You can install it globally using the following command:
npm install -g rninit
Once installed, you can create a new React Native project with the following command:
rninit init RNSimilar --source react-native@0.25.1
This will install React Native version 0.25.1 and React version 0.14.8.
Navigate inside the RNSimilar folder, open package.json and you should see the following:
{
  "name": "RNSimilar",
  "version": "0.0.1",
  "private": true,
  "scripts": {
    "start": "react-native start"
  },
  "dependencies": {
    "react": "^0.14.8",
    "react-native": "^0.25.1"
  }
}
Add the following right below react-native:
"react-native-button": "^1.6.0",
"react-native-fetch-blob": "^0.4.0",
"react-native-image-picker": "^0.18.15"
Run npm install to install the modules just added.
You use the react-native-button dependency for creating buttons, react-native-image-picker for picking images from the users photo gallery (or the device camera) and react-native-fetch-blob for sending the blob of the picked image to the API.
Next, install React Native package manager globally:
npm install rnpm -g
Once installed, while you’re still on the root directory of the project, run rnpm link to automatically configure the project to add the necessary android permissions and link the files for the third-party modules to work.
Entry Point File
Open index.android.js and replace the default code with the following:
import React, { Component } from 'react';
import {
  AppRegistry,
  StyleSheet,
  View
} from 'react-native';

import SimilarFaces from './components/SimilarFaces';

const image_picker_options = {
  title: 'Select Photo',
  takePhotoButtonTitle: 'Take Photo...',
  chooseFromLibraryButtonTitle: 'Choose from Library...',
  cameraType: 'back',
  mediaType: 'photo',
  maxWidth: 480,
  quality: 1,
  noData: false,
};

//the API Key that you got from Microsoft Azure
const api_key = 'YOUR FACE API KEY';

class RNSimilar extends Component {

  render() {
    return (
      <View style={styles.container}>
        <SimilarFaces imagePickerOptions={image_picker_options} apiKey={api_key} />
      </View>
    );
  }

}

const styles = StyleSheet.create({
  container: {
    flex: 1,
    justifyContent: 'center',
    alignItems: 'center',
    backgroundColor: '#ccc',
  }
});

AppRegistry.registerComponent('RNSimilar', () => RNSimilar);
Breaking down the code above. First you import the SimilarFaces component, where you find most of the app logic.
import SimilarFaces from './components/SimilarFaces';
Declare the options that the image picker will use. These are mostly clear so I’m not going to explain them here. You can visit the Github repo of this component to see what other options you can supply.
const image_picker_options = {
  title: 'Select Photo',
  takePhotoButtonTitle: 'Take Photo...',
  chooseFromLibraryButtonTitle: 'Choose from Library...',
  cameraType: 'back',
  mediaType: 'photo',
  maxWidth: 480,
  quality: 1,
  noData: false,
};
Add the API key from earlier:
const api_key = 'YOUR FACE API KEY';
Inside the main app component, use the SimilarFaces component which you will create shortly. Pass in the image picker options and the API key as properties so you can access them inside the component.
class RNSimilar extends Component {

  render() {
    return (
      <View style={styles.container}>
        <SimilarFaces imagePickerOptions={image_picker_options} apiKey={api_key} />
      </View>
    );
  }

}
Similar Faces Component
Create a components/SimilarFaces.js file and add the following:
import {
  AppRegistry,
  StyleSheet,
  Text,
  View,
  Image,
  TextInput,
  ScrollView
} from 'react-native';

import React, { Component } from 'react';

import NativeModules, { ImagePickerManager } from 'NativeModules';
import Button from 'react-native-button';

import Requestor from '../lib/Requestor';

let facelist_id = 'facelist_005';
let facelist_data = {
  name: 'My 5th facelist'
};

let face_api_base_url = 'https://api.projectoxford.ai';

export default class SimilarFaces extends Component {
  constructor(props) {
    super(props);
    this.state = {
      name: '',
        photo_style: {
            width: 480,
            height: 480
        },
        photo: null,
      similar_photo: null,
      message: ''
    };
  }

  render() {
    return (
      <ScrollView>
        <View style={styles.container}>
          <Button
            containerStyle={styles.button}
            onPress={this._createFaceList.bind(this)}>
            Create Face List
          </Button>

          <Image
            style={this.state.photo_style}
            source={this.state.photo}
            resizeMode={"contain"}
          />

          <Button
            containerStyle={styles.button}
            onPress={this._pickImage.bind(this)}>
            Pick Image
          </Button>

          <TextInput
            style={styles.text_input}
            onChangeText={this._changeName.bind(this)}
            value={this.state.name}
            placeholder={"name"}
          />

            <Button
                containerStyle={styles.button}
                onPress={this._addFaceToFaceList.bind(this)}>
                Add Face to Face List
            </Button>

            <Button
                containerStyle={styles.button}
                onPress={this._getSimilarFace.bind(this)}>
                Get Similar Face
            </Button>

          <Image
            style={this.state.photo_style}
            source={this.state.similar_photo}
            resizeMode={"contain"}
          />

          <Text style={styles.message}>{this.state.message}</Text>
        </View>
      </ScrollView>

    );
  }

  _changeName(text) {
    this.setState({
      name: text
    });
  }

  _pickImage() {

    ImagePickerManager.showImagePicker(this.props.imagePickerOptions, (response) => {

      if(response.error){
        alert('Error getting the image. Please try again.');
      }else{

        let source = {uri: response.uri};

        this.setState({
          photo_style: {
            width: response.width,
            height: response.height
          },
          photo: source,
          photo_data: response.data
        });

      }
    });

  }

  _createFaceList() {

    Requestor.request(
      face_api_base_url + '/face/v1.0/facelists/' + facelist_id,
      'PUT',
      this.props.apiKey,
      JSON.stringify(facelist_data)
    )
    .then(function(res){
      alert('Face List Created!');
    });

  }

  _addFaceToFaceList() {

    var user_data = {
      name: this.state.name,
      filename: this.state.photo.uri
    };

    Requestor.upload(
      face_api_base_url + '/face/v1.0/facelists/' + facelist_id + '/persistedFaces',
      this.props.apiKey,
      this.state.photo_data,
      {
        userData: JSON.stringify(user_data)
      }
    )
    .then((res) => {

      alert('Face was added to face list!');

    });

  }

  _getSimilarFace() {

    Requestor.upload(
      face_api_base_url + '/face/v1.0/detect',
      this.props.apiKey,
      this.state.photo_data
    )
    .then((facedetect_res) => {

      let face_id = facedetect_res[0].faceId;

      let data = {
        faceId: face_id,
        faceListId: facelist_id,
        maxNumOfCandidatesReturned: 2
      }

      Requestor.request(
        face_api_base_url + '/face/v1.0/findsimilars',
        'POST',
        this.props.apiKey,
        JSON.stringify(data)
      )
      .then((similarfaces_res) => {

        let similar_face = similarfaces_res[1];

        Requestor.request(
          face_api_base_url + '/face/v1.0/facelists/' + facelist_id,
          'GET',
          this.props.apiKey
        )
        .then((facelist_res) => {

          let user_data = {};
          facelist_res['persistedFaces'].forEach((face) => {
            if(face.persistedFaceId == similar_face.persistedFaceId){
              user_data = JSON.parse(face.userData);
            }
          });

          this.setState({
            similar_photo: {uri: user_data.filename},
            message: 'Similar to: ' + user_data.name + ' with confidence of ' + similar_face.confidence
          });

        });

      });

    });

  }
}

const styles = StyleSheet.create({
  container: {
    flex: 1,
    alignItems: 'center'
  },
  button: {
    padding: 10,
    margin: 20,
    height: 45,
    overflow: 'hidden',
    backgroundColor: 'white'
  },
  text_input: {
    height: 40,
    borderColor: 'gray',
    borderWidth: 1,
    backgroundColor: '#FFF'
  },
  message: {
    fontSize: 20,
    fontWeight: 'bold'
  }
});

AppRegistry.registerComponent('SimilarFaces', () => SimilarFaces);
Breaking down the code above. First you have the usual import statements:
import {
  AppRegistry,
  StyleSheet,
  Text,
  View,
  Image,
  TextInput,
  ScrollView
} from 'react-native';
Include react-native-button and react-native-image-picker:
import NativeModules, { ImagePickerManager } from 'NativeModules';
import Button from 'react-native-button';
Include the custom library for making HTTP requests to the Face API. You’ll be creating this in the Requestor section later.
import Requestor from '../lib/Requestor';
Declare the data used when creating a face list, adding faces to face list and getting a similar face. The facelist_id is the unique ID for the face list and facelist_data is the descriptive name that you want to give to the face list. You can change the values for these if you want.
let facelist_id = 'facelist_003';
let facelist_data = {
  name: 'My facelist'
};
Add the base URLs for the Face API:
let face_api_base_url = 'https://api.projectoxford.ai';
Add the default values for the data that you will use inside the component:
constructor(props) {
  super(props);
  this.state = {
    name: '', //the name of the person to add
    photo_style: { //default styling for the selected photo
      position: 'relative',
      width: 480,
      height: 480
    },
    photo: null, //the source uri of the selected photo
    similar_photo: null, //the source uri of the similar photo
    message: '' //the message to display once a similar face is returned
  };
}
The render method returns the UI of the app. This contains the button for creating a face list, displays the photo selected by the user, the button for selecting photos, a text input for entering the name of the person added, the button for getting a similar face, the photo of a similar face and a custom message.
render() {
  return (
    <ScrollView>
      <View style={styles.container}>
        <Button
          containerStyle={styles.button}
          onPress={this._createFaceList.bind(this)}>
          Create Face List
        </Button>

        <Image
          style={this.state.photo_style}
          source={this.state.photo}
          resizeMode={"contain"}
        />

        <Button
          containerStyle={styles.button}
          onPress={this._pickImage.bind(this)}>
          Pick Image
        </Button>

        <TextInput
          style={styles.text_input}
          onChangeText={this._changeName.bind(this)}
          value={this.state.name}
          placeholder={"name"}
        />

        <Button
          containerStyle={styles.button}
          onPress={this._addFaceToFaceList.bind(this)}>
          Add Face to Face List
        </Button>

        <Button
          containerStyle={styles.button}
          onPress={this._getSimilarFace.bind(this)}>
          Get Similar Face
        </Button>

        <Image
          style={this.state.photo_style}
          source={this.state.similar_photo}
          resizeMode={"contain"}
        />

        <Text style={styles.message}>{this.state.message}</Text>
      </View>
    </ScrollView>

  );
}
The _changeName function updates the state of the new value of the text field for entering a person’s name.
_changeName(text) {
  this.setState({
    name: text
  });
}
The _pickImage function allows the user to pick an image either from the camera or the gallery. This uses the react-native-image-picker library. Once you receive a response, update the style of the image container with the dimensions of the image picked. Also set the file path and the base64 representation of the image into the state. This way you can use it later when adding faces to the face list or when getting the similar face.
_pickImage() {

  ImagePickerManager.showImagePicker(this.props.imagePickerOptions, (response) => {

    if(response.error){
      alert('Error getting the image. Please try again.');
    }else{

      let source = {uri: response.uri};

      this.setState({
        photo_style: {
          width: response.width,
          height: response.height
        },
        photo: source, //file path of the image
        photo_data: response.data //base64 representation of the image
      });

    }
  });

}
Next is the _createFaceList function which sends a request for creating a new face list to the Face API. The facelist_data is the hard-coded object which you declared near the top of the file earlier.
_createFaceList() {

  Requestor.request(
    face_api_base_url + '/face/v1.0/facelists/' + facelist_id,
    'PUT',
    this.props.apiKey,
    JSON.stringify(facelist_data)
  )
  .then(function(res){
    alert('Face List Created!');
  });

}
The _addFaceToFaceList function adds face data to a face list, this time using the upload function from the Requestor library. This accepts the URL where you want to send the request as its first argument, the API Key as its second, the base64 representation of the selected photo as the third, and the user data as the fourth. The value for userData is converted to a string because the upload function sends it as a query parameter. That’s also why you’re limited to sending minimal data with a maximum length of 1KB.
_addFaceToFaceList() {

  var user_data = {
    name: this.state.name,
    filename: this.state.photo.uri
  };

  Requestor.upload(
    face_api_base_url + '/face/v1.0/facelists/' + facelist_id + '/persistedFaces',
    this.props.apiKey,
    this.state.photo_data,
    {
      userData: JSON.stringify(user_data)
    }
  )
  .then((res) => {

    alert('Face was added to face list!');

  });

}
The _getSimilarFace function first sends a request to the face detect endpoint. This assigns a unique ID to the faces detected in the photo and returns them along with the width, height, top, and left position for constructing a box surrounding the detected face. But for this tutorial you’re only using the face ID.
_getSimilarFace() {

  Requestor.upload(
    face_api_base_url + '/face/v1.0/detect',
    this.props.apiKey,
    this.state.photo_data
  )
  .then((facedetect_res) => {

    ...

  });

}
Here’s a sample response to give you an idea what the data you’re working with looks like:
[
    {
        "faceId": "c5c24a82-6845-4031-9d5d-978df9175426",
        "faceRectangle": {
            "width": 78,
            "height": 78,
            "left": 394,
            "top": 54
        }
    }
]
Once you receive a response, extract the faceId from the first row of data. The code below assumes that the photo has a single face in it, that’s why it only extracts the first row.
let face_id = facedetect_res[0].faceId;
Next, construct the object containing the data that’s required by the find similar faces endpoint. This includes the face_id received from the face detect call, the ID of the face list where the Face API is going to perform its search, and the maximum number of similar faces to return. In this case sticking with two.
You specify 2 although you’re only going to display one similar face because specifying 1 would return the photo with the closest match. This means if you add me.jpg and me2.jpg to the face list, and then select me.jpg again for getting the similar faces, it will return me.jpg if you only specify 1 as the value for maxNumOfCandidatesReturned.
If you specify 2 and then extract the second row from the results, you’ll get me2.jpg instead. This works vise-versa (supplying me2.jpg to the similar faces endpoint returns me.jpg). All this means is that you’re getting the second closest match so there is no chance that the API will ever return the same photo.
let data = {
  faceId: face_id,
  faceListId: facelist_id,
  maxNumOfCandidatesReturned: 2
}
Send the request to the find similar faces endpoint, converting the data constructed into string because it’s what’s expected by the Face API.
Requestor.request(
  face_api_base_url + '/face/v1.0/findsimilars',
  'POST',
  this.props.apiKey,
  JSON.stringify(data) //convert data to a string
)
.then((similarfaces_res) => {

    ...

});
Once you receive a response, extract the second row from the results returned. Then make a request to the endpoint for getting a specific face list. This contains all the face data added by the user. Loop through it to find the one with the same face ID as the one returned by the similar faces endpoint.
Note: You need to parse the userData because it’s saved as string. You then use the data to update the state with the similar photo and the message containing the name of the similar face and the confidence number. The confidence number is between 0 and 1. Numbers closer to 1 means a higher possibility that the photo the user supplied is of the same person as the one returned by the API.
let similar_face = similarfaces_res[1];

Requestor.request(
  face_api_base_url + '/face/v1.0/facelists/' + facelist_id,
  'GET',
  this.props.apiKey
)
.then((facelist_res) => {

  let user_data = {};
  facelist_res['persistedFaces'].forEach((face) => {
    if(face.persistedFaceId == similar_face.persistedFaceId){
      user_data = JSON.parse(face.userData);
    }
  });

  this.setState({
    similar_photo: {uri: user_data.filename},
    message: 'Similar to: ' + user_data.name + ' with confidence of ' + similar_face.confidence
  });

});
Here’s a sample response from the find similar faces endpoint:
[
    {
        "persistedFaceId" : "015839fb-fbd9-4f79-ace9-7675fc2f1dd9",
        "confidence" : 0.82
    },
    ...
]
Add the styles:
const styles = StyleSheet.create({
  container: {
    flex: 1,
    alignItems: 'center'
  },
  button: {
    padding: 10,
    margin: 20,
    height: 45,
    overflow: 'hidden',
    backgroundColor: 'white'
  },
  text_input: {
    height: 40,
    borderColor: 'gray',
    borderWidth: 1,
    backgroundColor: '#FFF'
  },
  message: {
    fontSize: 30,
    fontWeight: 'bold'
  }
});
Requestor
The Requestor library makes HTTP requests to the Face API. Create a lib/Requestor.js file and add the following:
import RNFetchBlob from 'react-native-fetch-blob';

module.exports = {
    upload: function(url, api_key, photo, query_params){

        var ret = [];
        for(var d in query_params){
            ret.push(encodeURIComponent(d) + "=" + encodeURIComponent(query_params[d]));
        }

        var url = url + "?" + ret.join("&");

        return RNFetchBlob.fetch('POST', url, {
            'Accept': 'application/json',
            'Content-Type': 'application/octet-stream',
            'Ocp-Apim-Subscription-Key': api_key
        }, photo)
        .then((res) => {
            return res.json();
        })
        .then((json) => {
            return json;
        })
        .catch(function (error) {
            console.log(error);
        });
    },

    request: function(url, method, api_key, data){

        let headers = {
            'Content-Type': 'application/json',
            'Ocp-Apim-Subscription-Key': api_key
        };

        let options = {
            'method': method,
            'headers': headers
        };

        if(typeof data != 'undefined'){
            options.body = data;
        }

        return fetch(url, options)
        .then((res) => {
            return res.json();
        })
        .then((json) => {
            return json;
        })
        .catch(function(error){
            console.log(error);
        });
    }

}
Breaking down the code above. The upload function handles all the HTTP requests for uploading files to the Face API. This uses the react-native-fetch-blob library to send the base64 representation of the photo along with header information required by the Face API.
upload: function(url, api_key, photo, query_params){

  if(typeof query_params != 'undefined'){
    //construct the query parameter from the query_params object
    let ret = [];
    for(let d in query_params){
      ret.push(encodeURIComponent(d) + "=" + encodeURIComponent(query_params[d]));
    }

    let url = url + "?" + ret.join("&"); //combine the query parameters with the URL
  }

  return RNFetchBlob.fetch('POST', url, {
    'Accept': 'application/json',
      'Content-Type': 'application/octet-stream',
      'Ocp-Apim-Subscription-Key': api_key
  }, photo)
  .then((res) => {
    return res.json();
  })
  .then((json) => {
    return json;
  })
  .catch(function (error) {
    console.log(error);
  });
},
Next is the request method which handles simple HTTP requests such as posting string data to a server.
request: function(url, method, api_key, data){

    let headers = {
        'Content-Type': 'application/json',
        'Ocp-Apim-Subscription-Key': api_key
    };

    let options = {
        'method': method,
        'headers': headers
    };

    if(typeof data != 'undefined'){
        options.body = data;
    }

    return fetch(url, options)
    .then((res) => {
        return res.json();
    })
    .then((json) => {
        return json;
    })
    .catch(function(error){
        console.log(error);
    });
}
Playing with the App
Launch the app. The first thing that you need to do is download photos of faces from the internet. Make sure that each photo contains one face and that each person should have at least two photos.
Once you’ve downloaded photos, copy those into your device and then run the app.
Tap on the create face list button. You should see an alert saying that the face list was created. Next, tap on the pick image button and pick one of the photos. Enter the name of the person and tap on the add face to face list button. You should see an alert saying that the face was added. Do this as many times as you want, but make sure that each person has at least two photos.
Lastly, tap on the pick image button again and pick the photo you want to use for getting the similar face. Once picked, tap on the get similar face button. This should return one of the photos of that person that you’ve added earlier, but not the same photo you picked.
Face the Future
That’s it! In this tutorial you worked with the Microsoft Face API. Specifically covering the face detection and similar faces searching feature. There are other cool things that you can do with the Face API, here are other features to look into:
- Face Detection: It’s a prerequisite for getting a similar face that’s why I didn’t cover face detection features such as estimating the age of a person or guessing their gender. You can also determine facial features such as if a person is wearing glasses or not, or facial hair.
- Face Grouping: For grouping faces based on similarity.
- Face Verification: For performing authentication against two detected faces. You can use this as a form of authentication in your React Native apps. Instead of having the user type in their email and password, they can take a selfie to login.
- Face Identification: For identifying people from a detected face. Like the similar faces API, you have to add faces first before you can make use of it.
Any other comments or question, please let me know below.
Frequently Asked Questions (FAQs) on Creating a Face Recognition App with React Native
What are the prerequisites for creating a face recognition app using React Native?
Before you start creating a face recognition app using React Native, you need to have a basic understanding of JavaScript and React Native. You should also have Node.js and npm (Node Package Manager) installed on your system. Additionally, you need to install and set up React Native CLI or Expo CLI on your system. You should also have a text editor like Visual Studio Code and a web browser for testing the app.
How can I integrate face recognition API in my React Native app?
To integrate face recognition API in your React Native app, you need to install the face recognition API package using npm. After installing the package, you can import it in your app and use its methods for face detection and recognition. You can also customize the settings of the API according to your requirements.
Can I use face recognition for user authentication in my React Native app?
Yes, you can use face recognition for user authentication in your React Native app. By integrating a face recognition API, you can authenticate users based on their facial features. This can provide an additional layer of security for your app and enhance the user experience.
How can I handle errors in face recognition in React Native?
You can handle errors in face recognition in React Native by using error handling methods provided by the face recognition API. These methods can help you detect and handle errors such as failure in face detection, multiple faces detected, and low-quality images.
How can I improve the accuracy of face recognition in my React Native app?
You can improve the accuracy of face recognition in your React Native app by adjusting the settings of the face recognition API. You can also use high-quality images for face detection and recognition. Additionally, you can implement machine learning algorithms to enhance the accuracy of face recognition.
Can I use face recognition in React Native for both Android and iOS?
Yes, you can use face recognition in React Native for both Android and iOS. React Native is a cross-platform framework, which means you can develop apps for both Android and iOS using the same codebase. However, you may need to make some platform-specific adjustments for optimal performance.
How can I test the face recognition feature in my React Native app?
You can test the face recognition feature in your React Native app by using the built-in testing tools in React Native. You can also use third-party testing tools for more advanced testing. Additionally, you can perform manual testing by running the app on different devices and checking the performance of the face recognition feature.
Can I use other biometric features along with face recognition in my React Native app?
Yes, you can use other biometric features along with face recognition in your React Native app. By integrating multiple biometric APIs, you can authenticate users based on their facial features, fingerprints, and voice. This can provide multi-factor authentication for your app and enhance the security.
How can I optimize the performance of face recognition in my React Native app?
You can optimize the performance of face recognition in your React Native app by using efficient coding practices and optimizing the settings of the face recognition API. You can also use performance profiling tools to identify and fix performance bottlenecks in your app.
Can I use face recognition in React Native for real-time applications?
Yes, you can use face recognition in React Native for real-time applications. The face recognition API provides real-time face detection and recognition capabilities, which can be used for applications such as live video streaming, video conferencing, and real-time user authentication.
 Wern Ancheta
Wern is a web developer from the Philippines. He loves building things for the web and sharing the things he has learned by writing in his blog. When he's not coding or learning something new, he enjoys watching anime and playing video games.